June 29, 2021

Using Kubernetes with Oracle Digital Assistant

 In this blog post, we are going to see how we can include Kubernetes in the Oracle Digital Assistant (ODA) solution. 

Where can we include Kubernetes with ODA:

We can integrate any backend services with ODA using the custom components (using SDK) services in ODA. And these services are of four types.

  • Embedded Container: To upload the custom components code into the given embedded container of the ODA
  • Oracle Mobile Cloud: To connect the custom components deployed in the Oracle Mobile Cloud Service (OMCS) using its backend and service URL.
  • External: To connect the custom components deployed in the external or third-party servers.
  • Oracle Function: To connect the custom components deployed in the Oracle Functions cloud service using its URL.
Out of the above given four types of services for the custom components, we can use the type "External" to connect the custom component code deployed in the Kubernetes.


Why do we need to use Kubernetes with ODA:

As you know, ODA has inbuilt AI and ML processing which helps to train the chatbot. And the training is a continuous process to make the chatbot better. And also ODA supports multiple skills development. When ODA has more skills that are connecting with multiple backend services, we may need to write the custom components for multiple skills. And for complex chatbots, changing the code and uploading the ODA every time will be a very tedious task. So, in such scenarios, if the team is willing to use Kubernetes for the custom code development, then they have a choice to do so. They can use the Kubernetes to automate the deployment process without impacting the front end of ODA.

How to connect Kubernetes with ODA:

                     Oracle Digital Assistant - Custom Components Service


Once the custom component code is deployed in the Kubernetes, configure its public URL and its authentication as shown in the above image. Then the chatbot is ready to be connected to the backend.

March 10, 2021

Integrating WhatsApp to Oracle Digital Assistant (ODA) as a client via Twilio

In this post, we are going to see how to connect WhatsApp as a client to have a conversation with Oracle Digital Assistant. 

In order to achieve this integration, we need to create a sandbox in Twilio and create a channel in ODA for Twilio. We need a Twilio account to do this integration. We will see each of these setups.

Setup Testing Sandbox in Twilio for WhatsApp

We need to create a sandbox for WhatsApp, which follows the below procedure. 

  • Login to Twilio
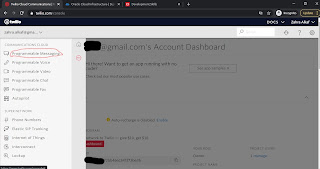
  • Under "All Products & Services", select the "Programmable Messaging" option. 
Twilio Programmable Messages Option
  • Its dashboard will be opened. You can observe a message like below to start connecting WhatsApp. Click on the link.

Building with whatsapp

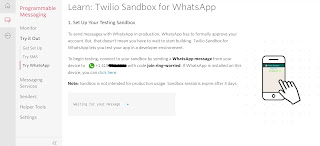
  • Sandbox setup for WhatsApp will be started
Setup testing Sandbox for WhatsApp in Twilio
  • Save the given phone number on your mobile
  • Send the given message (ex: join ring-worried) from your WhatsApp to the above number
  • You can observe the confirmation on the screen for your message
Setup testing Sandbox for WhatsApp in Twilio 2
  • Click on the "Next" button below
  • Ignore the step "Send a One-Way WhatsApp Message" and click on Next
  • You can send a reply to the message on your device which will be displayed here. You can send a message from the console and see the message on your WhatsApp. This is to test the Two-Way messages from your WhatsApp to Twilio and vice versa, though this step is not mandatory.
Setup testing Sandbox for WhatsApp in Twilio 3
  • Click on Next
  • Copy and paste the webhook URL created in the ODA channel (which will be shown in next steps) into the "WHEN A MESSAGE COMES IN" input field as shown in the below picture
Setup testing Sandbox for WhatsApp in Twilio 4
  • Click on Save

Setup ODA Channel for Twilio

  • Login to ODA
  • Go to Channels
  • Click on "+ Channel" button to create a new channel
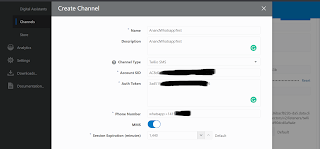
  • Enter name & description of the channel
  • Select Channel Type as "Twilio SMS"
  • Copy-paste the Account SID and Auth Token from the Twilio account dashboard
  • In the Phone Number field, enter the phone number you saved on your device which was given by Twilio in the above procedure
  • Make sure you prefix the phone number with "whatsapp:" and the phone number should be in international format. You can refer to the below screenshot for the inputs 
Creating ODA channel for Twilio
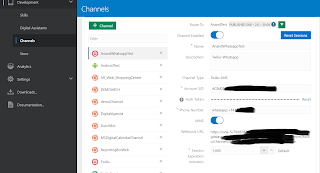
  • Click on the "Create" button, the channel will be created
  • Select a skill or digital assistant from the "Route To" drop-down
  • Enable the channel
  • Copy the Webhook URL and past it in the "WHEN A MESSAGE COMES IN" input field of the Twilio Sandbox created in the above procedure
Channel creation for Twilio in ODA

Now the WhatsApp is ready to start the conversation with ODA. You can test the chatbot now. See the below screen for your reference.

Connecting ODA chatbot through WhatsApp


#chatbot #DigitalAssistant #ODA

February 25, 2021

IEEE Paper - Dynamic Information Retrieval With Chatbots: A Review of Artificial Intelligence Methodology

I am happy to share, my co-authored IEEE paper on a chatbot use case with the title "Dynamic Information Retrieval With Chatbots: A Review of Artificial Intelligence Methodology" has been published. 

The full article can be accessed from here: Dynamic Information Retrieval With Chatbot


February 3, 2021

Integrating Oracle Digital Assistant with Oracle Analytics Cloud via SOAP webservice

In this post, you will see the integration between ODA (Oracle Digital Assistant) and OAC(Oracle Analytics Cloud) dashboard.

Creating OAC dashboard:

  • For the integration, we created a sample OAC dashboard as shown in the below screenshot
  • Soap services are exposed for the dashboard
Changes required to the ODA custom component:
  • Add the "soap" module to the ODA custom code node project
  • In the component javascript file, uses the below program code.  Where,  
    • createClient() is the method to create a connection to the soap WSDL which expects WSDL URL
    • Once the client is created, then you can use the methods in the Webservice
    • For example, logon() is a method that takes the user credentials as input arguments and returns a unique session  d which can be used in the further requests
    • Also in the below example, another method executeXMLQuery() is used which also part of the WSDL which expects an XML as input.
var soap = require('soap');
    var url = 'https://XXXX-XXXXXXXX-ld.analytics.ocp.oraclecloud.com/analytics-ws/saw.dll/wsdl/v12';
    var args = { name: 'username@oracle.com', password: "password" };  

    soap.createClient(url, function (err, client) {
      client.logon(args, function (err, result) {
        var sid = result.sessionID.$value;
        console.log(sid);
          rPath = "/shared/COVID19NL/Covid19NL";
 var xmlQueryArgs = {
          report: { reportPath: rPath },
          outputFormat: "",
          executionOptions: { async: '', maxRowsPerPage: '', refresh: '', presentationInfo: '', type: '' },
          sessionID: sid, 
reportParams:{variables:[{"name":"varCity","value":"Amsterdam"},  {"name":"varMonth","value":"Apr"}]}         
        };
 
        var xmlResult = "";
        var transition = "success";
        var filteredRows = [];
 client.executeXMLQuery(xmlQueryArgs, function (err, result) {
          if (err) {
            transition = "fail";            
            console.log(err.body);
            conversation.reply(err).transition(transition);
            done();
            return;
          }
          
          xmlResult = result.return.rowset.$value;
          var convert = require('xml-js');
          var options = { compact: true, ignoreComment: true, spaces: 4 };
          var resp = convert.xml2json(xmlResult, options);
          var rows = JSON.parse(resp).rowset.Row;

          if (rows && rows.length > 0) {
            filteredRows = rows;
            transition = "success";
            console.log(filteredRows);
          }
          else {
            transition = "none";
          }

          conversation.transition(transition);
          conversation.variable('resultRows', filteredRows);
          done();
        });
});
});